- A Minimal OttoMagic Smoke Test
- Automating a Desktop App: Notepad++
- Automating a Login Flow with a Native Menu Selection
- Automating Microsoft Teams with Desktop Application Selectors
- Automating YouTube Studio: Navigating a Multi-Step Upload Dialog
- Behavior-Style Workflows with GPAL.Gherkin
- Building a Form: Controls, FillInFrom, and CallAfterFillIn
- Building a Live AI Summarizer Form
- Calling REST Endpoints with GPAL.RESTClient
- Casting a Tab or Desktop to a Network Device
- Chaining Browser Actions Through GPAL.RESTClient with AndThen
- Chaining Workflows: CallAfterFillIn and CallIfFound Together
- Clicking a Captcha with a GPALForm and Hardware Input
- Cross-Site Workflow: Find a Book, Then Search for It Elsewhere
- Downloading and Patching a Browser Driver Automatically
- Downloading Files with a Right-Click
- Drag and Drop with Image-Based Selectors
- Driving a Browser Directly with PuppeteerClient
- Driving a Live Browser Through GPAL.OttoMagicClient
- Driving a Search Box from a GPALFile of Search Terms
- Driving a Search Form from a Database Table
- Driving Native Dropdown Menus with SelectClick
- Driving Native Dropdowns with SelectClick
- Driving the Browser Through the REST Client
- Dropping Down to PuppeteerCommunicator: Raw Chrome DevTools Commands
- Encryption, Hashing, and Signing with GPAL Cryptography
- Filling In Special-Format Inputs: Color, Date, Time, and More
- GPALConverter: Moving Data Between CSV, JSON, XML, YAML, and Classes
- Handling Cookie Banners and Popups with Persistent Selectors
- Image Matching and Selectors Inside Iframes
- Inside the GPAL REST API Server (OttoMagic's Backend)
- Launching Chrome with a Real Browser Profile
- Layer-by-Layer: Click, Fill In, and Read
- Left Click and Upload: Driving a File Picker
- Left-Click and Download a File
- Logging to a Database and Sending Email with GPAL
- Pacing a Workflow with WaitFor
- Paging with Workflows: While and Until
- Reading, Writing, and Clearing Browser Storage
- Reading, Writing, and Formatting Google Sheets
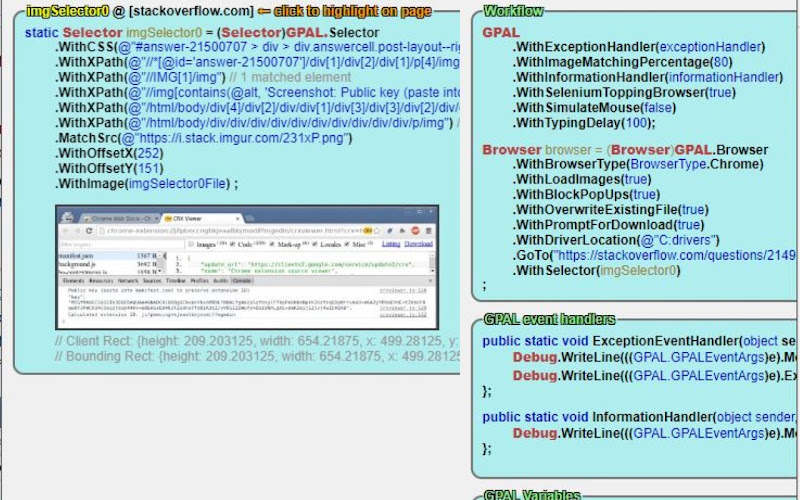
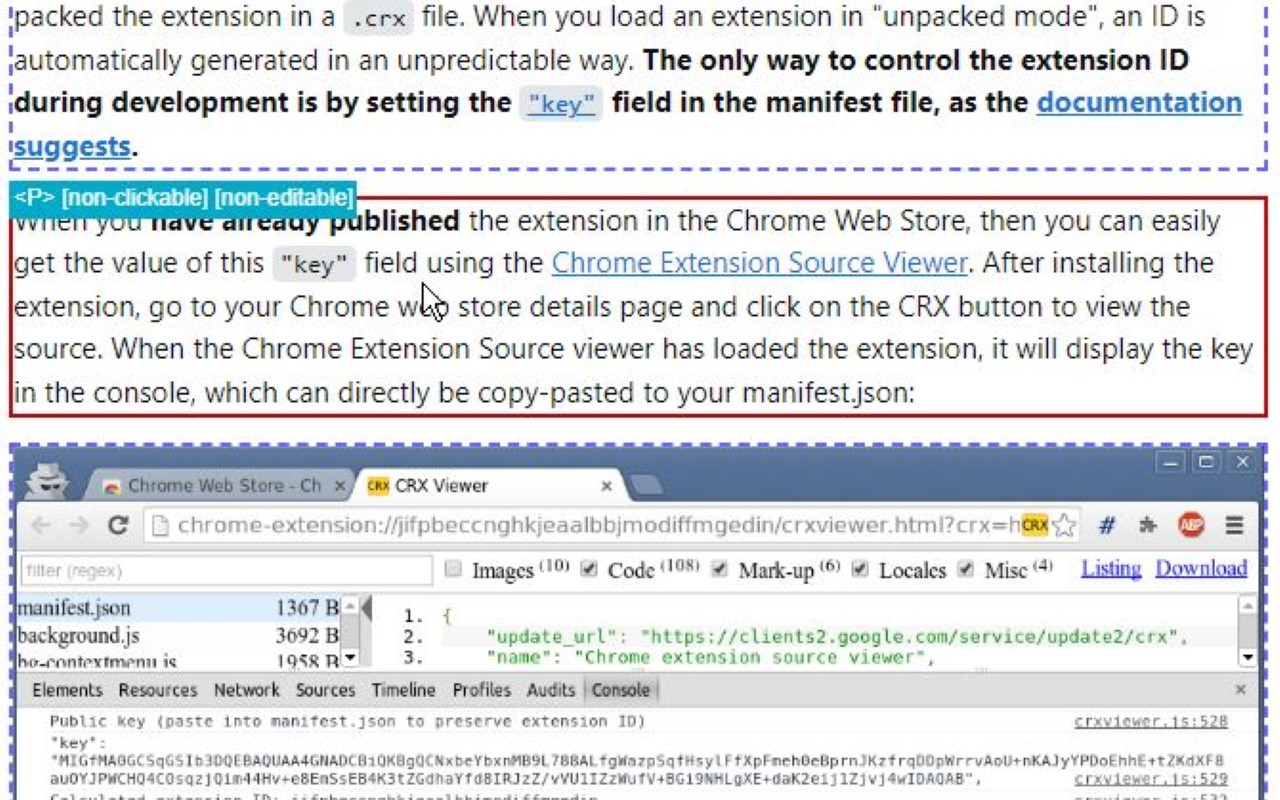
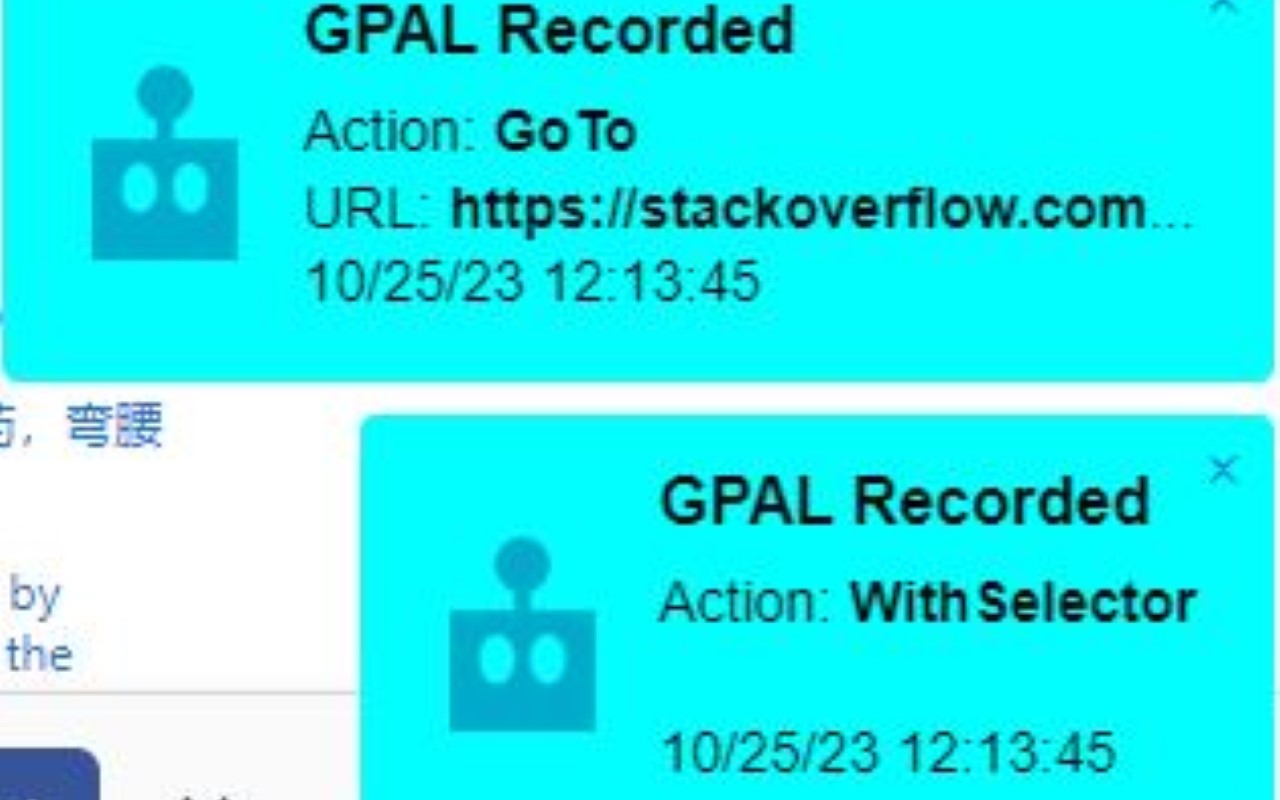
- Recording and Replaying a Selector Sequence
- Searching the Web with GPAL.GoogleDorking
- Talking to an OpenAPI-Described Service
- Testing Stealth Against Anti-Bot Detection Sites
- Walking Sitemaps and Capturing Page Digests
- Working with Spreadsheets: GPAL.Excel End to End
Tutorials
Building a Form: Controls, FillInFrom, and CallAfterFillIn
GPALForm lets you build a real Windows Form out of fluent GPAL control definitions, then drive it from a data file. This tutorial builds a small form with a label, buttons, radio buttons, and a checkbox, fills it from a GPALFile row by row with FillInFrom, pops up an approval dialog after each row via CallAfterFillIn, and shows the difference between Show() and ShowDialog().
Complete Program
Here's the whole workflow, start to finish. Each piece is broken down and explained below.
using GenerallyPositive;
using GenerallyPositive.GPALForm;
using static GenerallyPositive.GPALForm.GPALForm;
using static GenerallyPositive.Enums;
using System.Windows.Forms;
using Keys = System.Windows.Forms.Keys;
static GPALButton startButton = GPAL.Button
.WithName("button1")
.WithText("Start The Workflow")
.WithCallback<EventHandler>(StartButtonClickHandler)
.WithShortcutKey(Keys.Alt | Keys.S)
.ToGPALObject();
static GPALRadioButton chromeRadio = GPAL.RadioButton
.WithChecked(true)
.WithName("Radiobutton1")
.WithText("Chrome")
.ToGPALObject();
static GPALRadioButton edgeRadio = GPAL.RadioButton
.WithName("Radiobutton2")
.WithText("Edge")
.ToGPALObject();
static GPALCheckbox overwriteCheckbox = GPAL.Checkbox
.WithText("Overwrite")
.ToGPALObject();
static GPALLabel titleLabel = GPAL.Label
.WithText("Form Tester")
.ToGPALObject();
// approval popup shown after each row is filled in
static GPALLabel approvalLabel = GPAL.Label.WithText("Approve this entry?").ToGPALObject();
static GPALInput approvalReason = GPAL.Input.WithText("").ToGPALObject();
static GPALButton approveButton = GPAL.Button.WithName("ApproveButton").WithText("Approved").WithCallback<EventHandler>(ApproveButtonClickHandler).ToGPALObject();
static GPALButton notApproveButton = GPAL.Button.WithName("NotApproveButton").WithText("Not Approved").WithCallback<EventHandler>(NotApproveButtonClickHandler).ToGPALObject();
static bool approvalResult = false;
static GPALForm approvalForm = GPAL.Form
.WithTitle("Approval")
.WithLeft(1500).WithTop(400).WithWidth(300).WithHeight(180)
.WithFormControl(approvalLabel)
.WithFormControl(approvalReason)
.WithFormControl(approveButton)
.WithFormControl(notApproveButton)
.ToGPALObject();
static GPALFile inputFile = ((GPALFile)@"c:sdiebay.words.txt").WithDelimiter(',').ToGPALObject();
[STAThread]
static void Main(string[] args)
{
GPALForm myForm = GPAL.Form
.WithTitle("Simple Form Test")
.WithLeft(1500).WithTop(100).WithWidth(350).WithHeight(700)
.WithFormControl(titleLabel)
.WithFormControl(startButton)
.WithFormControl(chromeRadio)
.WithFormControl(edgeRadio)
.WithFormControl(overwriteCheckbox)
.CallAfterFillIn(CallAfterFillIn)
.ToGPALObject();
myForm
.Show()
.FillInFrom(inputFile)
.ShowDialog();
}
public static CallIfStatus CallAfterFillIn(GPALForm myForm, IGPALGrid<string> tokens, int tokenIdx)
{
((TextBox)approvalReason.WindowsControl).Text = "";
approvalForm
.WithLeft(myForm.Left + myForm.Width)
.WithTop(myForm.Top)
.ShowDialog();
return CallIfStatus.NotHandled;
}
private static void ApproveButtonClickHandler(object sender, EventArgs e)
{
approvalResult = true;
CloseParentForm(sender);
}
private static void NotApproveButtonClickHandler(object sender, EventArgs e)
{
approvalResult = false;
CloseParentForm(sender);
}
private static void CloseParentForm(object sender)
{
Control control = (Control)sender;
while (null != control.Parent)
control = control.Parent;
control.Hide();
}
private static void StartButtonClickHandler(object sender, EventArgs e)
{
// kick off the automation workflow using the values chosen on the form
}
Define Controls with One Pattern Each
Every control follows the same shape: start from GPAL.Button, GPAL.RadioButton, GPAL.Checkbox, GPAL.Label, and so on, chain With* calls to configure it, then finish with ToGPALObject(). WithCallback wires up an event handler, WithShortcutKey adds an Alt-key accelerator, and WithChecked/WithText set initial state. The same pattern applies whether you're building a button, a combo box, a chart, or a tree view.
static GPALButton startButton = GPAL.Button
.WithName("button1")
.WithText("Start The Workflow")
.WithCallback<EventHandler>(StartButtonClickHandler)
.WithShortcutKey(Keys.Alt | Keys.S)
.ToGPALObject();
static GPALRadioButton chromeRadio = GPAL.RadioButton
.WithChecked(true)
.WithName("Radiobutton1")
.WithText("Chrome")
.ToGPALObject();
static GPALCheckbox overwriteCheckbox = GPAL.Checkbox
.WithText("Overwrite")
.ToGPALObject();
Because every control is a real object (gPalButton1, gPalRadioButton1, etc), you can read and write its state (Enabled, Checked, Text) from anywhere in the program - including from event handlers on other controls - using simple write-through property setters.
Assemble the Form
GPAL.Form is itself a fluent builder. WithFormControl adds each control in the order you want it laid out, and ToGPALObject() produces the GPALForm you'll show. CallAfterFillIn registers a callback that fires once per row when the form is later driven from a data file.
GPALForm myForm = GPAL.Form
.WithTitle("Simple Form Test")
.WithLeft(1500).WithTop(100).WithWidth(350).WithHeight(700)
.WithFormControl(titleLabel)
.WithFormControl(startButton)
.WithFormControl(chromeRadio)
.WithFormControl(edgeRadio)
.WithFormControl(overwriteCheckbox)
.CallAfterFillIn(CallAfterFillIn)
.ToGPALObject();
Show, FillInFrom, and ShowDialog
Show() makes the form visible but non-blocking, which gives FillInFrom something to update on screen as it works. FillInFrom(inputFile) walks the GPALFile row by row, populating matching controls from each row's values and firing CallAfterFillIn after each row. ShowDialog() then blocks until the user closes the form, the same way a normal modal dialog would.
myForm
.Show()
.FillInFrom(inputFile)
.ShowDialog();
Show() before ShowDialog() is only useful when something between them - like FillInFrom here - needs the form visible but non-blocking first. If you don't need that, just call ShowDialog() directly.
CallAfterFillIn: React to Each Row
CallAfterFillIn receives the form, the full grid of tokens from the data file, and the index of the row just filled in. Here it pops up a small modal approval form next to the main form, positioned using the main form's Left/Top/Width so it doesn't overlap. Returning CallIfStatus.NotHandled lets GPAL continue its normal fill-in processing for the next row.
public static CallIfStatus CallAfterFillIn(GPALForm myForm, IGPALGrid<string> tokens, int tokenIdx)
{
((TextBox)approvalReason.WindowsControl).Text = "";
approvalForm
.WithLeft(myForm.Left + myForm.Width)
.WithTop(myForm.Top)
.ShowDialog();
return CallIfStatus.NotHandled;
}
Calling ShowDialog() from inside CallAfterFillIn pauses the fill-in loop on that row until the approval form is closed. That's the point here - it forces a human decision per row - but be aware it turns an otherwise automatic loop into a step-through workflow.
Documentation Example
Documentation
Showing off some plain text in these paragraphs eligendi laboriosam illo nostrum corporis at libero vel voluptas? Expedita, facere dolores voluptatem ad ab rem assumenda soluta!
Lorem ipsum dolor sit amet consectetur adipisicing elit. Obcaecati, iste distinctio veritatis eligendi laboriosam illo nostrum corporis at libero vel voluptas? Expedita, facere dolores voluptatem ad ab rem assumenda soluta!
Lorem ipsum dolor sit amet consectetur adipisicing elit. Obcaecati, iste distinctio veritatis eligendi laboriosam illo nostrum corporis at libero vel voluptas? Expedita, facere dolores voluptatem ad ab rem assumenda soluta!
Category
-
Endpoint
Lorem ipsum dolor sit amet consectetur adipisicing elit. Quo veniam mollitia excepturi animi eum illum non libero sapiente provident assumenda, delectus voluptatum nobis sed dolorem adipisci laudantium incidunt. Error, ratione?
-
Enpoint
Lorem ipsum dolor sit amet consectetur adipisicing elit. Quo veniam mollitia excepturi animi eum illum non libero sapiente provident assumenda, delectus voluptatum nobis sed dolorem adipisci laudantium incidunt. Error, ratione?
-
Enpoint
Lorem ipsum dolor sit amet consectetur adipisicing elit. Quo veniam mollitia excepturi animi eum illum non libero sapiente provident assumenda, delectus voluptatum nobis sed dolorem adipisci laudantium incidunt. Error, ratione?
-
Enpoint
Lorem ipsum dolor sit amet consectetur adipisicing elit. Quo veniam mollitia excepturi animi eum illum non libero sapiente provident assumenda, delectus voluptatum nobis sed dolorem adipisci laudantium incidunt. Error, ratione?
Other formats
Here you can find different accents and emphasis sit amet consectetur adipisicing elit. Obcaecati, iste distinctio veritatis eligendi laboriosam illo nostrum corporis at libero vel voluptas? Expedita, facere dolores voluptatem ad ab rem assumenda soluta!
This is a link and how it could look like bestlinkinthebeautifulworld. Obcaecati, iste distinctio veritatis eligendi laboriosam illo nostrum corporis at libero vel voluptas? Expedita, facere dolores voluptatem ad ab rem assumenda soluta!
Here's just some classic bold text adipisicing elit. Obcaecati, iste distinctio veritatis eligendi laboriosam notBoldSecondbestlinkinthebeautifulworld illo nostrum corporis at libero vel voluptas? Expedita, facere dolores voluptatem ad ab rem assumenda soluta!
Obcaecati, iste distinctio veritatis eligendi laboriosam adipisicing elit illo nostrum corporis at adipisicing elit libero vel voluptas? Expedita, adipisicing facere dolores voluptatem ad ab rem assumenda soluta!
Other cuple of colors in case we want to emphasize several ways adipisicing elit. Obcaecati, iste distinctio veritatis eligendi laboriosam adipisicing elit illo nostrum corporis at voluptatem libero vel voluptas? Expedita, facere dolores voluptatem ad ab rem assumenda soluta!
Adding Images to the content
Lorem ipsum dolor sit amet consectetur adipisicing elit. Obcaecati, iste distinctio veritatis eligendi laboriosam illo nostrum corporis at libero vel voluptas? Expedita, facere dolores voluptatem ad ab rem assumenda soluta!
Lorem ipsum dolor, sit amet consectetur adipisicing elit. Quod veniam, quam ad expedita laborum sed at voluptates culpa ipsam ut vel. Ullam temporibus a mollitia quod aliquam ratione exercitationem nesciunt.
Lorem ipsum dolor sit amet consectetur adipisicing elit. Obcaecati, iste distinctio veritatis eligendi laboriosam illo nostrum corporis at libero vel voluptas? Expedita, facere dolores voluptatem ad ab rem assumenda soluta!
Coding Blocks
Lorem ipsum dolor sit amet consectetur adipisicing elit. Repudiandae quas consequuntur illo numquam assumenda autem exercitationem distinctio perspiciatis in natus. Eius dicta similique ipsam ipsa minima, nemo quae enim tempore.
GPAL
.CallIfNotFound(GenericCallIfNotFound)
.WithPublishToConsole();
//System.Drawing.Rectangle windowSize = new System.Drawing.Rectangle(10, 10, 1500, 1024);
// NOTE: we have to set browser = before we execute any steps
// this is due to the 'GenericCallIfNotFound' which might throw an exception, and BankScraper will not have the browser set when it calls scraper.Close()
// until the complete fluent line gets executed (meaning every step, meaning browser is not set until everything else succeeds)
browser = GPAL.Browser
.WithBrowserType(Enums.BrowserType.Chrome)
.WithProfileDataDirectory(ChromeProfileLocation)
.WithUseAutomationEngine(AutomationEngine.Selenium)
.WithWindowSize(new System.Drawing.Rectangle(0,0,1920,1080))
.ToGPALObject();
Documentation
Showing off some plain text in these paragraphs eligendi laboriosam illo nostrum corporis at libero vel voluptas? Expedita, facere dolores voluptatem ad ab rem assumenda soluta!
Lorem ipsum dolor sit amet consectetur adipisicing elit. Obcaecati, iste distinctio veritatis eligendi laboriosam illo nostrum corporis at libero vel voluptas? Expedita, facere dolores voluptatem ad ab rem assumenda soluta!
Lorem ipsum dolor sit amet consectetur adipisicing elit. Obcaecati, iste distinctio veritatis eligendi laboriosam illo nostrum corporis at libero vel voluptas? Expedita, facere dolores voluptatem ad ab rem assumenda soluta!
Category
-
Endpoint
Lorem ipsum dolor sit amet consectetur adipisicing elit. Quo veniam mollitia excepturi animi eum illum non libero sapiente provident assumenda, delectus voluptatum nobis sed dolorem adipisci laudantium incidunt. Error, ratione?
-
Enpoint
Lorem ipsum dolor sit amet consectetur adipisicing elit. Quo veniam mollitia excepturi animi eum illum non libero sapiente provident assumenda, delectus voluptatum nobis sed dolorem adipisci laudantium incidunt. Error, ratione?
-
Enpoint
Lorem ipsum dolor sit amet consectetur adipisicing elit. Quo veniam mollitia excepturi animi eum illum non libero sapiente provident assumenda, delectus voluptatum nobis sed dolorem adipisci laudantium incidunt. Error, ratione?
-
Enpoint
Lorem ipsum dolor sit amet consectetur adipisicing elit. Quo veniam mollitia excepturi animi eum illum non libero sapiente provident assumenda, delectus voluptatum nobis sed dolorem adipisci laudantium incidunt. Error, ratione?
Other formats
Here you can find different accents and emphasis sit amet consectetur adipisicing elit. Obcaecati, iste distinctio veritatis eligendi laboriosam illo nostrum corporis at libero vel voluptas? Expedita, facere dolores voluptatem ad ab rem assumenda soluta!
This is a link and how it could look like bestlinkinthebeautifulworld. Obcaecati, iste distinctio veritatis eligendi laboriosam illo nostrum corporis at libero vel voluptas? Expedita, facere dolores voluptatem ad ab rem assumenda soluta!
Here's just some classic bold text adipisicing elit. Obcaecati, iste distinctio veritatis eligendi laboriosam notBoldSecondbestlinkinthebeautifulworld illo nostrum corporis at libero vel voluptas? Expedita, facere dolores voluptatem ad ab rem assumenda soluta!
Obcaecati, iste distinctio veritatis eligendi laboriosam adipisicing elit illo nostrum corporis at adipisicing elit libero vel voluptas? Expedita, adipisicing facere dolores voluptatem ad ab rem assumenda soluta!
Other cuple of colors in case we want to emphasize several ways adipisicing elit. Obcaecati, iste distinctio veritatis eligendi laboriosam adipisicing elit illo nostrum corporis at voluptatem libero vel voluptas? Expedita, facere dolores voluptatem ad ab rem assumenda soluta!
Adding Images to the content
Lorem ipsum dolor sit amet consectetur adipisicing elit. Obcaecati, iste distinctio veritatis eligendi laboriosam illo nostrum corporis at libero vel voluptas? Expedita, facere dolores voluptatem ad ab rem assumenda soluta! Lorem ipsum dolor, sit amet consectetur adipisicing elit. Quod veniam, quam ad expedita laborum sed at voluptates culpa ipsam ut vel. Ullam temporibus a mollitia quod aliquam ratione exercitationem nesciunt.
Lorem ipsum dolor sit amet consectetur adipisicing elit. Obcaecati, iste distinctio veritatis eligendi laboriosam illo nostrum corporis at libero vel voluptas? Expedita, facere dolores voluptatem ad ab rem assumenda soluta! Lorem ipsum dolor, sit amet consectetur adipisicing elit. Quod veniam, quam ad expedita laborum sed at voluptates culpa ipsam ut vel. Ullam temporibus a mollitia quod aliquam ratione exercitationem nesciunt.
Lorem ipsum dolor sit amet consectetur adipisicing elit. Obcaecati, iste distinctio veritatis eligendi laboriosam illo nostrum corporis at libero vel voluptas? Expedita, facere dolores voluptatem ad ab rem assumenda soluta!
Coding Blocks
Lorem ipsum dolor sit amet consectetur adipisicing elit. Repudiandae quas consequuntur illo numquam assumenda autem exercitationem distinctio perspiciatis in natus. Eius dicta similique ipsam ipsa minima, nemo quae enim tempore.
GPAL
.CallIfNotFound(GenericCallIfNotFound)
.WithPublishToConsole();
//System.Drawing.Rectangle windowSize = new System.Drawing.Rectangle(10, 10, 1500, 1024);
// NOTE: we have to set browser = before we execute any steps
// this is due to the 'GenericCallIfNotFound' which might throw an exception, and BankScraper will not have the browser set when it calls scraper.Close()
// until the complete fluent line gets executed (meaning every step, meaning browser is not set until everything else succeeds)
browser = GPAL.Browser
.WithBrowserType(Enums.BrowserType.Chrome)
.WithProfileDataDirectory(ChromeProfileLocation)
.WithUseAutomationEngine(AutomationEngine.Selenium)
.WithWindowSize(new System.Drawing.Rectangle(0,0,1920,1080))
.ToGPALObject();